


Acrylic Thermoforming Technical Guide
Shop cleanliness really is one of those things that separates good parts from scrap. The whole thermoforming area has to stay absolutely clean all the time. Even a little dust or lint in the air will show up as defects on the finished surface.
What Thermoforming Actually Is
Thermoforming means heating a plastic sheet until it's soft and rubbery, then shaping it over or into a mold with vacuum, pressure, or mechanical force. It can be anything from a guy doing it by hand in a small shop to a fully automated line running thousands of parts a day.
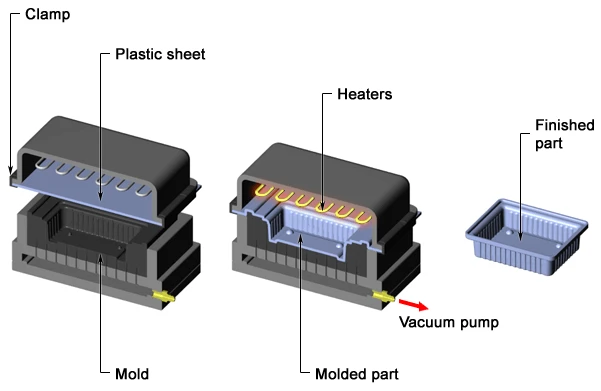
Why People Still Choose Thermoforming
Compared to injection molding or blow molding, thermoforming has some very real advantages:
- Forming pressures are ridiculously low – often just a few psi.
- You can make really big parts without spending a fortune.
- The mold sees almost no force, so you can make it out of cheap materials – wood, plaster, resin, resin, aluminum – whatever works.
- Tooling lead time is measured in days or weeks, not months. That's why almost every prototype, trade-show model, or short-run part is thermoformed.
Of course, once you get past roughly 10–20k pieces, injection molding usually wins on piece-price-wise. Here's a real-world cost comparison one shop gave me for a typical medium-complexity part:
| Process | Tooling Cost | 500 pcs | 5,000 pcs | 10,000 pcs | 20,000 pcs |
|---|---|---|---|---|---|
| Pressure forming | ~$5,000 | $16.66 | $6.95 | $6.40 | $6.10 |
| Injection molding | ~$37,500 | $78.07 | $10.37 | $6.53 | $4.65 |
You can see where the crossover happens.
Material Differences That Actually Matter
Cast acrylic has very high molecular weight – it fights you when you try to stretch it, but it holds heat well and doesn't sag as much in the oven.
Extruded acrylic has lower molecular weight – it flows beautifully, gives razor-sharp detail, but it's much more sensitive to uneven heating. If one side gets hotter than the other, you'll see it immediately in the finished part.
Things You Have to Think About When Designing the Part
You only get fine detail on the mold-contact side. The other side is always the "free" surface.
Acrylic moves a lot with temperature, so any tolerance tighter than ±0.020" needs to state "at 70 °F" or whatever temperature you mean.
Put at least 5° draft everywhere – more is better.
Sharp corners are the enemy. Every corner should have a radius. The bigger the radius, the more even the wall thickness and the lower the molded-in stress.
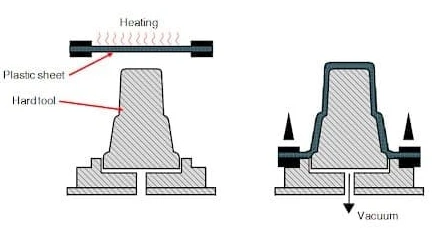
Deep draws need multi-stage forming (plug, billow, snap-back, etc.). Shallow stuff can be done with simple vacuum or pressure.
Wall thickness always thins out as you draw deeper. If you don't pre-stretch the sheet, the sidewalls can end up paper-thin while the rim stays thick.
Mold Design Notes From Years of Doing This
Mold materials we actually use:
Prototypes → wood, MDF, plaster, renboard, epoxy tooling board
Production → cast aluminum for 1,000–10,000 pcs, machined or water-cooled aluminum/steel for longer runs.
Surface finish: smooth is good, mirror is bad (traps air). Most of us use a light bead-blast or very fine EDM texture. If the customer wants leather or haircell, we just etch it into the mold.
Vacuum holes – the same rules everyone forgets:
- Hole diameter never bigger than sheet thickness
- Always back-drill with ¼–⅜" bit to about 0.090" from surface
- Too few holes → whale skin or incomplete forming
- Too many or too big → little dimples you can't polish out
Mold temperature – keep it around 190 °F (88 °C). Cold mold = chill marks and crazy stress. Hot mold = you wait forever for the part to cool.
Male vs female molds – remember:
Male mold → thickest material at the bottom, thin at the rim
Female mold → thickest at the rim, thinnest at the bottom
Choose according to where you need the material.

Vacuum & Pressure Systems (the stuff that usually gets skimped on)
You really want 28–30 inHg at the mold face. Every 90° elbow you can delete is worth real money in cycle time.
Pressure side: 99% of parts are done at 20–50 psi. Only the really deep or sharp-detail jobs go to 100–150 psi. Air has to be bone-dry and oil-free.
Pre-drying
Extruded sheet almost never needs it. If it's been sitting in a humid warehouse for months, throw it in an oven at 176 °F for a day. Cast sheet – basically never dry it.
Clamping
Cold clamps are the #1 cause of webbing and no-draw at the edges. Heat the clamp frames. Seriously.
Typical forming temperatures we actually use:
| Material | Forming range | Safe removal temp | Usual mold temp |
|---|---|---|---|
| Extruded acrylic | 290–320 °F | 185 °F | ~190 °F |
| Cast acrylic | 340–380 °F | 185 °F | ~190 °F |
Heating – Still the Most Important Step
Thin sheet (< 4 mm) → double-sided quartz infrared, fast and beautiful.
Thick sheet or optical parts → forced-air convection oven, period. If you try to infrared-heat 6 mm cast sheet you'll blister the surface long before the core is hot enough.
Rough heating times with good double quartz at ~1200 °F heater temperature:
| Thickness | Time (both sides hit) |
|---|---|
| 3 mm | 90–120 sec |
| 6 mm | 4–5 min |
| 9–10 mm | 8–11 min |
| 12 mm | 12–16 min |
Forming Methods We Actually Use Every Day
Shallow parts → straight vacuum or pressure forming
Medium draw → plug-assist pressure
Deep draw → billow + plug or snap-back + plug (best thickness distribution money can buy)
Optical parts → free-blown or vacuum-sag into a ring – no tool marks at all.
Cooling
Don't rush it. Cool both sides evenly until the part to at least below 150 °F before you pull it off the mold. Throw a thick felt blanket over thick parts so one side doesn't cool faster and lock in stress.
Shrinkage – It Will Happen
Extruded sheet shrinks up to 3% in machine direction, actually grows ~0.5% across.
Cast sheet shrinks about 1.5–2% both ways.
Always run a test blank first and measure hot, then adjust your blank size.

After Forming
Trim however you like – die cut in-line if you can afford it, 5-axis CNC or router table if you can't.
Anneal everything that will ever see solvent, alcohol, or outdoor weather. 175–180 °F for roughly 1 hour per mm thickness, cool no faster than 25 °F/hour. It's the difference between a part that lasts 6 months and one that lasts 15 years.


